

How To Do Garden Arigation
SKIP TO HOW-TO
One of the more relaxing chores in the world of gardening is sitting yourself down in a lawn chair, hose in hand, sending a gentle sprinkling of water onto your vegetable beds. That's the kind of lazy, hours long fun you can have when you're retired. But if you aren't? Install a drip irrigation system in your home garden. Right now.

Hand watering is almost meditative. Unless you're watering more than 4 feet of lawn that is. If you have 1,600 square feet, a self diagnosed hyperactivity disorder, and soil that drains like a gambler's bank account? THEN it just sucks.
So a few years ago I looked into installing a drip system for my vegetable garden.
And then I got overwhelmed and confused and felt like I might stroke out so I continued with hand watering. When I finally got around to installing a drip system I did that thing we all do when we put something off. I swore at myself for not doing it sooner. Big swears too.
It turns out drip systems aren't all that difficult. They just seeeeem difficult to the uninitiated. I ended up emailing the company I buy my row cover from and asked them to help me. They sell all the stuff you need for drip irrigation including entire kits with everything included. I just wasn't sure what size kit I needed or if I needed two of them or if I should just do it without a kit.
So I took a shot, randomly sent them my garden plan and asked for help.

Within a few days someone from the company sent me back a mock up of my garden with a drip layout, a list of everything I needed to do it and the price it would be ($324 for my entire 40′ X 40′ plot.)
It took 3 days after work to install (working 2-3 hours each time) and I love it with all of my heart. I big heart love it. I lasagna love it.
What's to love you ask? Here are a few things:
Benefits of Drip Irrigation
- No waste of water. It goes directly in the ground where you want it, not onto paths, not onto the dense layer of plant leaves and not into the air.
- You can water and work in your garden at the same time. Try doing that while dodging a sprinkler.
- Every single inch of your garden is watered. There are no dry or missed corners.
- Because the water is dripped so slowly it's fully absorbed deeply into the soil with no run off.
- You can set it to a timer and forget about it.
- It works especially well with raised beds which dry out more quickly than other types of beds.
So, just like installing LED lighting which you can read about here, drip irrigation can seem a bit YIKES, but once it's explained by someone as stupid as you are, it all makes sense. You just need an equally confused person to explain it to you.
I am just that person.
Here's a video of the entire drip system after I've installed it so you can make sense of the layout and what it all looks like.
HOW TO INSTALL DRIP IRRIGATION
There are 2 types of tubing with drip irrigation: the drip tube (or tape), which has holes in it for dripping water in the beds and the irrigation tubing which is the hose that feeds the drip hose.
- Assemble your filter and pressure reducer. (The pressure reducer ensures you always have constant water pressure at 12 psi.) Start your project at the end of your garden that's closest to the water supply.
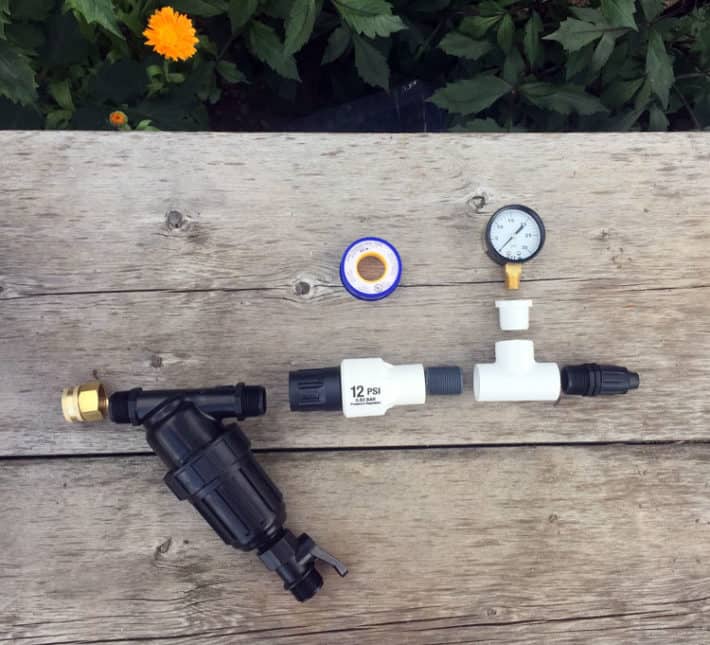
These are what the pieces look like unassembled but laid out in order.

Tape your pipe ends with plumbing tape (provided) and screw everything together. If you're ordering from the place I ordered from (Dubois Agrinovation) you'll get the exact same parts that go together in the exact same order, the exact same way).

- 2. Attach your assembled filter and pressure reducer to your garden hose. Make sure it is OFF. Then attach the end of your supply hose to the filter.

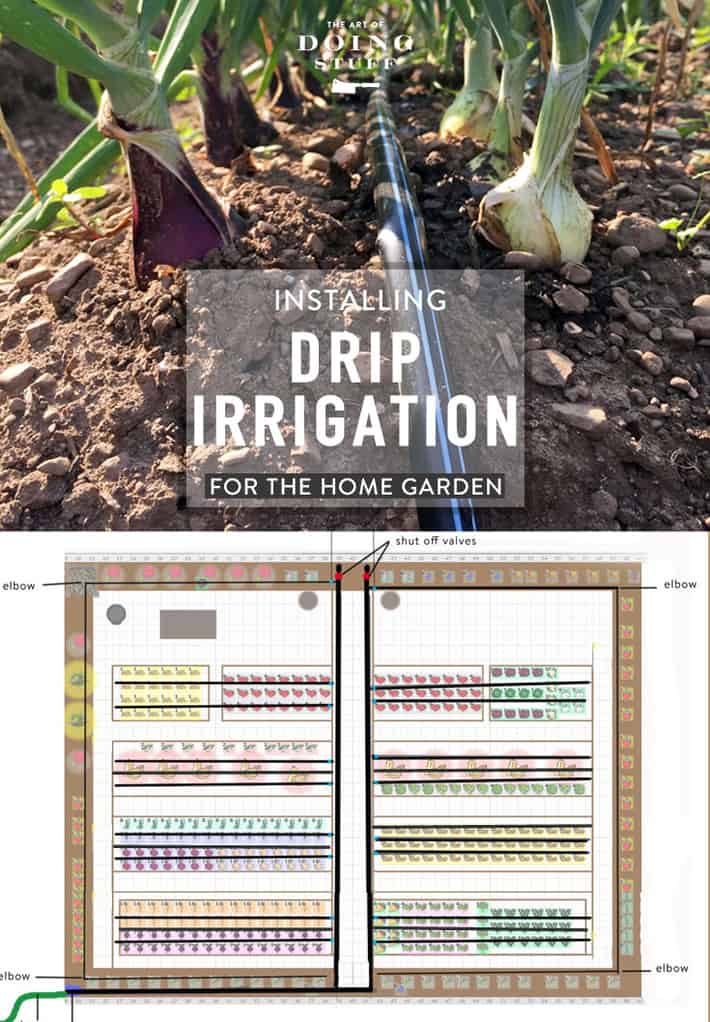
3. Run your supply hose to where you want your drip hoses to run. In my case I needed to run 2 supply hoses, one to feed the left side of my garden and one to feed the right side. To run the hose to where you need it you may need to cut the supply hose and attach elbows or tees, like you see below.

4. Run your supply hose the full length of your garden and attach shut off valves.

5. Cut your drip tape to length and lay them on your garden beds with the holes facing UP. You should have one drip tape per row of plants or approximately 1 drip tape every 12″.
*(laying drip tape would be much easier in the spring when the garden isn't full of plants)

6. Lay out all of your on/off valves where your drip tape meets your supply line.
*TIP: If you're working alone, lay a rock on one end of the drip tape while you run it to keep it in place.

If you're working in a garden with plants already, just lay the rock on one end of your drip tape then gently pull the plants up and lay the tape underneath. Then pull the drip line tight and straight.
7. Attach all of your drip tape on/off valves. For me there were 32 of them to fit. Here's how to attach the drip lines to the supply line.
You'll notice there aren't any drip emitters. Each piece of drip tape already has holes in it where the water seeps out.

8. Before you put the end caps on your drip line you have to purge the system so any dirt that got into the lines gets flushed out. Close the valves at the end of your supply line, make sure all the drip line valves are open and turn the water on. This is your first test run. Wooooo!

9. Once you've run the lines long enough for any soil to have been flushed out, turn the water off and attach the end caps to all of your drip lines.
10. Smile. Your system is now fully installed.

The drip system delivers water slowly through holes in the top of the drip tape. The water will spread out and down.
Here's a cross section of the soil after 1/2 an hour of the drip system running. You can see how far down and wide the water has travelled.

Still confused? Here it is in a nutshell.
- Assemble filter & pressure reducer.
- Attach garden hose and drip system supply hose.
- Run supply hose along where you want water.
- Attach drip tape off of supply hose.
- Purge system.
- Do a little dance, make a little love.
If you have a normal sized garden and only need 10 rows of drip tape, a kit with everything you need will cost you $155.
But there are kit sizes for every garden if you take a look here.
Materials
- Drip irrigation kit that includes tubing, drip tape, elbows, couplings, filter, pressure regulator etc.
- Water supply
Tools
- Scissors
- Wrench (possibly)
Instructions
- Line your filter and pressure reducerup according to the kits instructions or following the photo in this post.
- Tape your pipe ends with plumbing tape (provided) and screw everything together. If you're ordering from the place I ordered from (Dubois Agrinovation) you'll get the exact same parts that go together in the exact same order, the exact same way).
- Attach your assembled filter and pressure reducer to your garden hose. Make sure it is OFF. Then attach the end of your supply hose to the filter.
- Run your supply hose to where you want your drip hoses to run. In my case I needed to run 2 supply hoses, one to feed the left side of my garden and one to feed the right side. To run the hose to where you need it you may need to cut the supply hose and attach elbows or tees, like you see in my photos.
- Run your supply hose the full length of your garden and attach shut off valves.
- Cut your drip tape to length and lay them on your garden beds with the holes facing UP. You should have one drip tape per row of plants or approximately 1 drip tape every 12″.
- Lay out all of your on/off valves where your drip tape meets your supply line.
- Attach all of your drip tape on off valves. For me there were 32 of them to fit. Here's how to attach the drip lines to the supply line.
- Before you put the end caps on your drip line you have to purge the system so any dirt that got into the lines gets flushed out. Close the valves at the end of your supply line, make sure all the drip line valves are open and turn the water on. This is your first test run. Wooooo!
- Once you've run the lines long enough for any soil to have been flushed out, turn the water off and attach the end caps to all of your drip lines.
- Smile. Your system is now fully installed.
Notes
Quick Guide
- Assemble filter & pressure reducer.
- Attach garden hose and drip system supply hose.
- Run supply hose along where you want water.
- Attach drip tape off of supply hose.
- Purge system.
- Do a little dance, make a little love.
There's only a month or so more of this gardening business left in my part of the world. Once the end of September hits I'll be thinking about ordering firewood, finishing up some canning and practicing some brain exercises so that next year … I'll be better prepared to outsmart a slug.
QUESTIONS & ANSWERS
How long do you run the system? Drip systems run for anywhere from 1/2 hour – 2 hours at a time depending on your soil. Different soils need different amounts of water depending on how much they drain.
Do you have to take it all apart in winter? The system can stay put throughout the entire winter. Just drain or blow some of the water out of the lines so they don't freeze and break the tubes. The only thing you need to take apart and bring inside is the filter and pressure gauge.
Will anything on the system break?Over time the drip lines might get accidentally punctured or develop holes that make the water squirt high in the air. This is alarming at first. Don't worry about it. When you get your system you'll get a huge roll of drip line tape so you can easily just replace it by removing the old damaged drip tape and cutting a new length of drip tape and installing it.
Do you still like it? I love it! I love this drip system. I walk into my garden, turn the water on and let it do its thing while I work on other stuff. Seriously. I can't recommend one of these type of systems enough.
→Follow me on Instagram where I often make a fool of myself←
How To Do Garden Arigation
Source: https://www.theartofdoingstuff.com/drip-irrigation/
Posted by: williamsinquen.blogspot.com
0 Response to "How To Do Garden Arigation"
Post a Comment